New Tool - ZBrush Batch Ops

This is the third from-the-ground-up iteration of a ZBrush toolkit I released early 2019, and improves on the popular base functionality of the earlier kit with new scope limiting options, dockable UI and additional functions. 

As ever, the core of the tool deals with performing batch operations on all your subtools- I get the most use out of it when I'm first importing a model OR when I'm getting ready to export it for baking. 

The renaming and color ID assignment tools have been expanded to include new functions:

  • Find and replace subtool name elements. 
  • Reset materials on subtools. 
  • Apply a random color per folder. 

 Mesh options have been expanded to include batch options for:

  • Polygroup assignment
  • Crease assignment
  • Face visibility management. 
  • Batch baking all layers. 
Finally a tool I personally find really cool, but I don't know if anyone else will find useful- "Batch It Crazy"
  • Batch ANY BUTTON that you can find the path for. 
  • ... so if the button exists on the subtools you are managing you can press CTRL and hover over the button and find it's path.
  • Enter that string when prompted...
  • And that operation will be applied to every tool in the scope. 
As a promotion of the tool use this link to get $5 off the price (and as a thank-you for reading my techie blog!)


New Tool- Blender A3D Quick Tools

This tool came out of some frustration with the Blender Hotkey layouts. Blender has amazing functionality, but my fingers aren't flexible enough to keep up with the hotkeys, and I was really missing some more context to the right click menus available. I wanted a filtered, simple toolkit that was relevant to what I needed at that moment.

The main goal was to avoid interrupting the flow of modelling so I could focus on the problem at hand rather than either look up the functionality or spend the next few seconds scanning a right click menu for that item.

I decided to take a stab at making a hotkeyed pie Menu. Where Blender suffers in the UI/UX department, it more than shines in how well it exposes it's UI functionality to Python (although selection and mesh manipulation is still a bit of a dark art compared to Maya's MEL and PyMel).

I also wanted to keep it pretty concise- the core idea behind the Pie menu was to keep it fast, and keep the cognitive load low. I think I may have ended up a little bit on the too many options side, but it's still usable without getting lost.

Here are some of the items I did a bit of extra legwork to get in:

Partial Edge Loop Selection:

What I wanted was a version of edge loop selection that would stop at UV seams or where the mesh poles. The UV seams were the biggest driver of this to make marking seams easier, but it's a handy modelling tool too.

I started with an example I looked up on Stack Exchange about how the edge loop lookup code someone had written actually works. Essentially it relies on walking around a faces edges using linked loops, but has a bunch of caveats- the code as written works as intended on a cube or something where the loop actually, you know, loops, but when applied to something with borders the results are a bit weird...

Nailed it.

The algorithm has two termination conditions- either return back to the loop we started with and break, or reach the maximum iterations allowed and break. 

To get to my intended result I added a couple of additional boundary termination clauses- 
  • if the radial loops to either side of the current loop are seams or borders, break. 
  • If one of the current loop's vertices aren't associated with exactly four faces, break.
This worked well, but to get the final result I was after, I also had to reverse my lookup direction if I hit one of the boundary clauses. This would give me partial and complete loops on either side of my connected edges.


Partial edge loops are useful.


Partial edge loop selection in action.
Handy tool! If you want to see more check the tool out here.


-Pete

Blender: Calling parameters with UI Operators

A quick little tip for how to call parameters via UI operators in your scripts.

This is useful if you want to call a function that has parameters that change it's behavior- for example the bpy.ops.mesh.mark_sharp(clear=True) vs bpy.ops.mesh.mark_sharp() are the same operator with a flag that inverts the method's outcome- marking or clearing a sharp edge.

Your UI operator object wraps the python operator, including it's parameters. As long as you know what the parameters are you can call them explicitly on the UI object- either inline when it is declared, or on subsequent lines if you assign it to an object.

# ... in your Draw function...
# Default function to mark a sharp edge
pie.operator("mesh.mark_sharp", text="Mark Hard Edge", icon="BLENDER")

# We add the additional parameter here to clear the edge- this is the equivalent of calling
# bpy.ops.mesh.mark_sharp(clear=True)
pie.operator("mesh.mark_sharp", text="Clear Hard Edge", icon="BLENDER").clear = True

# If we have a custom operator with multiple parameters we can assign the operator to an object
# and call as many as required.
my_op = pie.operator("foo.bar", text="FooBar")
my_op.foo = True
my_op.bar = False
# ...etc...

Photoshop Comtypes 2020 edition

Hello! I got asked a question about smart layer manipulation and I didn't know the answer off of the top of my head, so I dug out this ye ole snippet of mine from 2012 and updated it to 2020.

Some small differences are that I had to add a couple of flags to the comtypes object creation (which may have just been a quirk of my machine, see the stackoverflow link for details) and I've added some details about manipulating smart layers at the bottom of the snippet.

Happy coding!

##############################################################################
#
# Eight years later, here is my 2020 version of how to use Comtypes to drive photoshop
#
# Here is a quick code sample showing how to manage different layers and groups  
# in a photoshop document using Python. 
#
# Pete Hanshaw, 2020
# http://peterhanshawart.blogspot.com.au/
#
##############################################################################
#
# How to make a layerSet (aka, 'group') artLayer (aka 'layer'), how to make them
# active and how to move them. 
#
# These examples use the comtypes module. Grab it here:
# http://sourceforge.net/projects/comtypes/
#
##############################################################################


#Create the application reference
import comtypes.client as ct

# https://stackoverflow.com/questions/42794530/error-pointeriunknown-when-trying-to-access-com-object-properties/42823644
psApp = ct.CreateObject('Photoshop.Application', dynamic=True)
psApp.Visible = True

#Create a new document to play with
doc = psApp.Documents.Add(256, 256, 72, 'test_bed', 2, 1, 1)

#When scripting 'groups' are called 'layerSets'. 
new_layerSet = doc.LayerSets.Add()

#Once you create a layerSet object reference, you can access it's
#'name' attribute. The same goes for other objects you can normally
#name within Photoshop.
new_layerSet.name = "I'm a layerSet"

#regular, paintable layers are called 'ArtLayers'
new_art_layer = doc.ArtLayers.Add()
new_art_layer.name = "I'm an ArtLayer"

#To add a nested art layer into a LayerSet, use our layerSet object as a reference
nested_art_layer = new_layerSet.ArtLayers.Add()
nested_art_layer.name = "I'm a nested ArtLayer"

#The same goes for adding a nested LayerSet!
nested_layerSet = new_layerSet.LayerSets.Add()
nested_layerSet.name = "I'm a nested LayerSet"

#and so on!
deep_art = nested_layerSet.ArtLayers.Add()
deep_art.name = "Deep man, deep."

#Every time a new object is made, it will become the active layer. 
#To make other layers active, you can refer to them either by their name, or 
#their index location. 

#For example:

#Making an art layer active using the layer's name:
doc.activeLayer = (doc.artLayers["I'm an ArtLayer"])

#Making an art layer active using the layer's index location:
doc.activeLayer = (doc.artLayers[-1]) #This will select the background!

#Selecting a nested art layer is a little more difficult, as you have to
#'drill down' through the hierachy in order to select it. 
doc.activeLayer = (doc.layerSets["I'm a layerSet"].
    layerSets["I'm a nested LayerSet"].
    artLayers["Deep man, deep."])

#Moving a layer in the hierachy is done using the move command.
#The arguments specify which hierachy to move in, and where to put it. 

#For example, this will move the first layerSet we made just above the background
#layer.

#Make a new layer set
mobile_layerSet = doc.LayerSets.Add()
mobile_layerSet.name = "move me"

#Move the 'mobile' layerSet to just after the 'background' layer
mobile_layerSet.Move(doc, 2)

# Smart Layer Manipulation Examples adapted from:
# https://www.photopea.com/tuts/edit-smart-objects-with-a-script/
# Create a smart object layer.

# CREATING A SMART LAYER
# select a layer that you want to work with
smart_layer = doc.ArtLayers.Add()
smart_layer.name = "Smarty pants Layer."

doc.activeLayer = smart_layer

# Convert the active layer into a smart object
psApp.executeAction(psApp.stringIDToTypeID("newPlacedLayer"));

# EDITING A SMART LAYER
# Now we can edit the smart object
psApp.executeAction(psApp.stringIDToTypeID("placedLayerEditContents"))

# now, the Smart Object is an active document, we can work with it. Rename the layer...
smartDoc = psApp.activeDocument
super_smart_layer = smartDoc.ArtLayers[0]
super_smart_layer.name = "Amazingly smart layer."

# save the smart object and close it
psApp.activeDocument.save()
psApp.activeDocument.close()

# We are now back in the root object

# QUERYING A SMART LAYER
# If we want to check if a layer is smart, we can query it...
doc = psApp.activeDocument

for layer in doc.ArtLayers:
    # 17 is a psSmartObjectLayer - see the Adobe Scripting API 'PsLayerKind' to see what each value means.
    if layer.Kind == 17:
        print "We found a smart layer named {}".format(layer.name)

New Tool- Substance Painter File Manager


I've added a new tool to my Gumroad store- a Substance Painter file manager to help browse larger projects.


Writing the tool was interesting- it took a while to find my way around some of the more advanced ideas in QML but I was pretty happy with how well it ties into the default Substance Painter GUI, as well as the examples contained in the default Painter installation directory.

If you want to see some examples of Substance's use of QML take a browse through your C:/Program Files/Allegorithmic/Substance Painter/qml/ directory. These are a fantastic resource, and it's great to see them included and accessible.

The Painter Javascript API is still very limited. A friend suggested I write the tool in the new Python API but I just missed the boat on that, with the majority of work already done prior to the release (I only have so much midnight oil to burn). To access the operating system and file information, I wrote a simple file browser utility in C++ and used the JS API to bridge it with the QML user facing GUI.

The cool thing about this approach (as heavy handed as it is) is that it massively opens up the options available to you in terms of OS operations, while at the same time keeping the compiled program really tiny (53kb) and removing worries about correct Python configurations.

That being said, I totally want to see what's available in the new Python API to see what kind of time saving tools I can provide to the content creators.


Maya- find node names that are not unique

Sometimes you can end up in situations where Maya Nodes don't have unique names. Usually this won't cause issues until you are doing global changes (like the hack amazing workaround where you remove namespaces on export)

Shawn Miller put me onto this handy little snippet to identify nodes that don't have Unique names:

string $allDagNodes[] = `ls -sn -dag`;
for ($node in $allDagNodes)
if (`gmatch $node "*|*"`)
print ($node+" is not uniquely named");

Thanks Shawn!

Maya Name Helpers

Hey, who likes well organized files? This guy. Who like manually renaming hundreds of objects? Nobody I've met.

I've found one of the best ways to help my art teams keep their content organized it to make it easier for them to manage their object names. I've wrapped up some of the most useful little scripts into this handy tool on Gumroad.

- Written for Maya 2019
- Batch rename multiple assets at once.
- Easily add, remove or replace elements in names.
- Quickly add or remove prefixes and suffixes.
- Easily convert between camelCase and underscore_naming
- Docks with the Maya GUI.
- Works on nodes, materials, objects. Pretty much anything you can select via the GUI.

Houdini: Point at center of primitive VEX

I didn't come up with this, but it's so handy I'm just gonna put it here (credit to this odforce post)

This this in a per-primitive wrangle to get a point at the center of each prim.

// Adds a point at the position of each prim
addpoint(0, @P);
// Remove primitive and all points connected to it
removeprim(0, @primnum, 1);

RenderDoc and Steam- Capturing Steam Apps in RenderDoc

Quick tip- if you want to use RenderDoc to capture an app you bought on Steam, don't launch the app directly via RenderDoc (for example by using the exe in the steamapps/common dir).

You want to wrap the steam exe instead and capture child processes.

To do this:

  • First kill any existing Steam processes.
  • Launch "C:\Program Files (x86)\Steam\Steam.exe" with "Capture Child Processes" checked.
  • You should now be able to launch any DX* apps and get frame captures from them. They will show up in RenderDoc as child processes. 

ZBrush Bake Helpers

I made a thing to help make my ZBrush bake workflow faster and less frustrating. I've put it up for the price of a coffee, which I now have the time to get due to all the time it saves me.

Maya Game Exporter Hax

I've been having some fun using the GameExporter that comes bundled with Maya. It's really nice to have a well featured exporter that you don't have to write yourself.

There is one thing that really bugs me about it though- I just can't find the button to suppress the "Replace files that already exist?" and "Success!" messages. Sure, I like the validation, but when I need to export 100+ files through a batch process it can get a bit tedious.

It doesn't feel as rewarding the 80th time...

Sooo... rather than doing anything fancy like finding the topmost window and deleting it or whatever, what if I just made it so the GameExporter just, you know, wouldn't do that, and just log to the script editor all nice like.

Enter global proc redefinition! Probably very familiar to anyone who uses MEL more than I do, you can redefine a gobal proc at any time, stomping it's previous behavior. (it's a bit more nuanced than that, but for my purposes, STOMP STOMP GOOD)

Anyway, you can probably see where this is going. I don't like the dialogue windows, and I would prefer them to just print to the log. Deep inside <InstallDir>\Maya2018\scripts\others are a bunch of scripts tellingly named "gameFbxExporter........mel".

Taking a browse through these I found three procedures that I happily made my own versions of:

global proc int gameExp_OverwriteExistingFile(string $path)
{
    print("Force overwriting files.\n");
    return 1;
}


global proc int gameExp_OverwriteExistingFiles(string $fileNameList[], int $overwriteListLimit)
{
    print("Force overwriting files.\n");
    return 1;
}

global proc gameExp_ShowMessage(string $message, int $msgType)
{
    print $message;
    print "\n";
}


Executing that through the script editor now logs my super helpful messages, but without the messy dialogue prompts.

Now, you might be thinking, it would be less destructive to have taken the whole original function and maybe, you know, added an option for suppressing the dialogue, and you would be right.

But STOMP STOMP GOOD. BATCH EXPORT GOOD. Also tired.

Calling Python from Substance Painter

Here is a quick code snippet for calling a Python script from Substance Painter and parsing the results.

The in/out is very simple, but serves as an example of using the alg.subprocess.check_output function to bridge the JS api and your own Python scripts.


// This can be called from the QML UI, or elsewhere in the plugin code. 
function GetAllFilesInDirectory(root)
{
  if (root == undefined)
  return;

  // I put my scripts in a relative path to keep my plugin tidy. 
  var script_path = "Scripts/FileUtils.py";

  // Gathering files
  var ret = "NOSTRING";
  try
  {
      // The arguments are used as parameter inputs to the Python script. This requires some planning
      // and well communicated conventions, but works well enough. 
      ret = alg.subprocess.check_output(
          [
          pypath, // Absolute path to interpreter.
          script_path, // Relative path to the py script.
          "log_files_of_type", // sys.argv[1], in this case the python method I'm calling.
          root, // sys.argv[2], used as a parameter for my method, in this case, the root directory to find files in.
          "spp" // sys.argv[3], used as a parameter for my method, in this case the file type extension to look for.
          ]
      );
  }
  catch(err)
  {
      alg.log.exception(err);
      return;
  }

  // Iterating the returned string 
  var file_urls = [];
  var all_files = ret.split(/\r?\n/);
  for (x = 0; x < all_files.length; x++) 
  { 
      var local_file = all_files[x];
      if(local_file.length == 0)
          continue;

      // Convert the file names to the native substance path URL format. 
      var project_url = alg.fileIO.localFileToUrl(local_file);
      file_url.push(project_url);
  }
  return file_urls;
}


The Python script is also quite simple:

function GetAllFilesInDirectory(root)
#!/usr/bin/env python3

import glob
import sys

def log_files_of_type(root_dir, ext):
    """
    Returns a list of all the files with a given extension in the named directory. 
    @param root_dir : the directory to parse. 
    @param ext : the extension to match. 
    """
    for filename in glob.iglob(root_dir + '**/*.{0}'.format(ext), recursive=True):
        print(filename)

if __name__ == "__main__":
    # Select the method to run based off of the arguments.
    # args are [0] script name, [1] method name. Subsequent args are arbitrary based on method called. 
    method_name = str(sys.argv[1])

    if method_name == "log_files_of_type":
        log_files_of_type(sys.argv[2], sys.argv[3])


I find that any script I write that passes information back and forth between two different platforms/interpreters usually comes with it's own set of headaches.

This kind of string parsing should look familiar to anyone who has done work with Photoshop bridging tools, or who has chosen to wrap the P4 command line interface themselves.

(PS... syntax highlighting borked... should fix that one of these days...)


Making A Hello World Substance Painter Plugin


Substance Painter plugins use the QT Meta Language, or QML files to build their interface. From Wikipedia:

It is a JSON-like declarative language for designing user interface–centric applications. Inline JavaScript code handles imperative aspects. It is part of Qt Quick, the UI creation kit developed by Nokia within the Qt framework.

Using this information, we can start building a window with a button to execute our script.

Visual Studio Code


For this tutorial I’m going to be using Visual Studio Code, a lightweight IDE from Microsoft. It’s not the same thing as Visual Studio, but it’s a nice scripting editor that’s available on Mac, Linux and PC. Other text editors like Sublime will do the job quite well.

Installing QML Syntax Highlighting


  • By default, QML files will appear as ordinary text files in Visual Studio Code. While this won’t stop you from being able to write the plugin, adding some QML support will make reading, organizing and editing our script easier. 
  • To do this, I’m going to install a QML extension in Visual Studio Code for Syntax highlighting. 
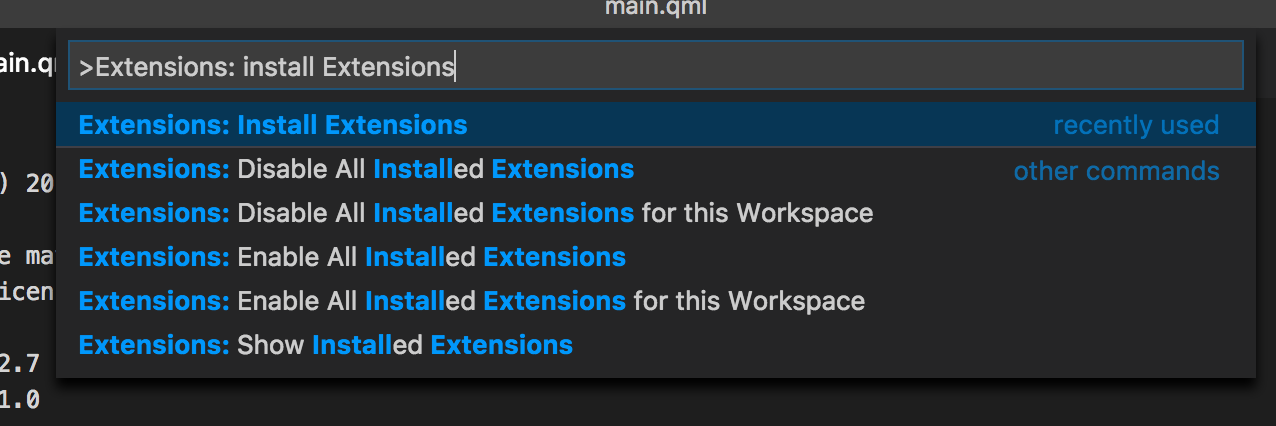
  • Use the View->Command Palette and type in Extensions: Install Extensions


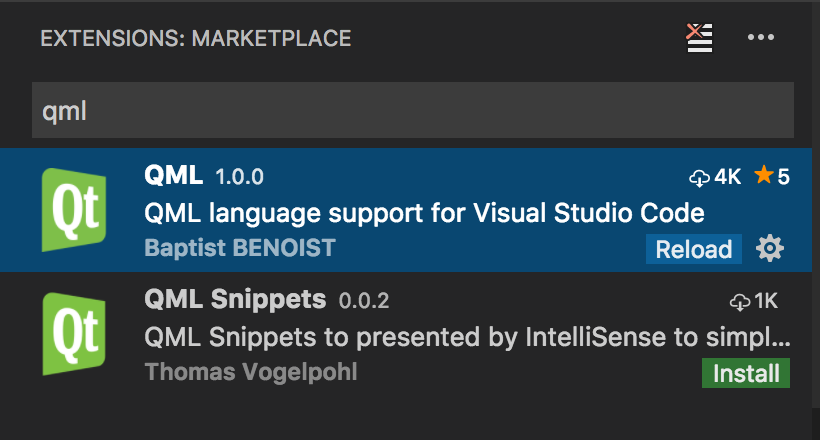
  • Type in “QML” into the search bar and install the “QML language support for Visual Studio Code” extension. 
  • Once it is installed, restart visual studio code- your QML files will now have syntax highlighting. 

Starting our Plugin

  • This is some documentation online for substance painter scripting, but your installation also comes with some example plugins.
  • Plugins for Substance Painter live in 
    • Windows : C:\Users\*username*\Documents\Allegorithmic\Substance Painter\plugins 
    • Mac OS : /Users/<username>/Documents/Allegorithmic/Substance Painter/plugins 
    • Linux : /home/*username*/Documents/Allegorithmic/Substance Painter/plugins 
  • Note that for this tutorial I am using Substance Painter 2017x - the plugin directory changed since version 2.
  • This is where we will be creating our plugin- be sure to look through the other plugins there to see how they work. 
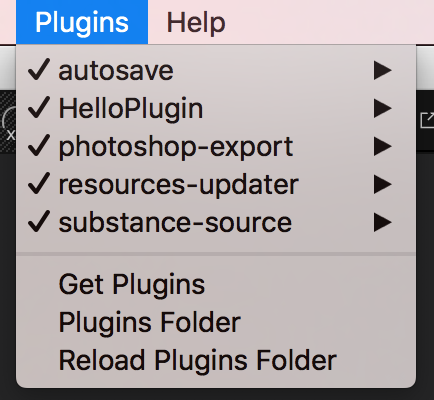
  • Valid plugins here will automatically be detected by Substance Painter when it is first opened, and become available via the Plugins menu option. 

Making a Hello World Plugin

  • For a plugin to be valid, it needs to have a definition, and a main entry point qml file. 
  • Navigate to the plugins directory for your system. 
  • Create a folder here called “HelloPlugin” 
  • Inside the plugin, create two files- 
    • plugin.json 
    • main.qml 

Filling in the main file:

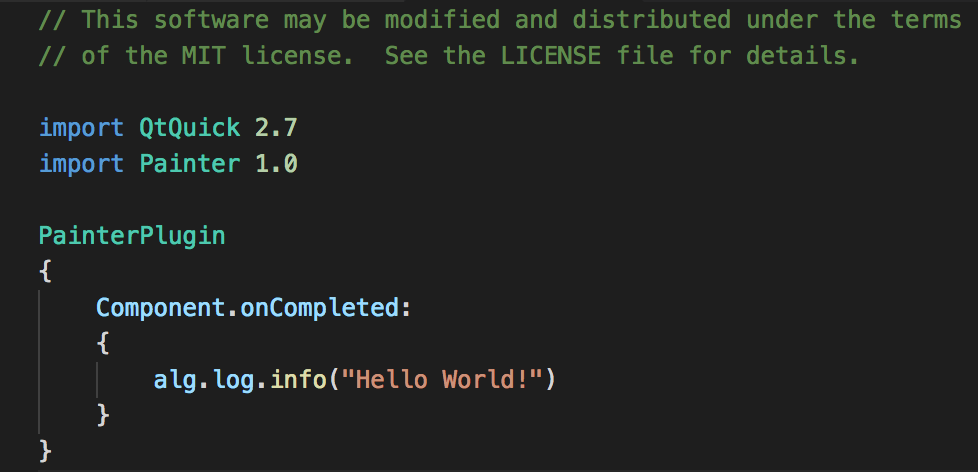
  • The main.qml file is the entry point to your plugin. 
  • When the plugin is first loaded, this file will be used to initialize any additional data or properties the plugin needs, like adding extensions to the main toolbar. 
  • For now, we are going to make a really simple main function, which will log “Hello world!” to the console when the plugin is loaded. 
Ship it!

Filling in the JSON file:

  • The JSON file contains a manifest of metadata about your plugin. 
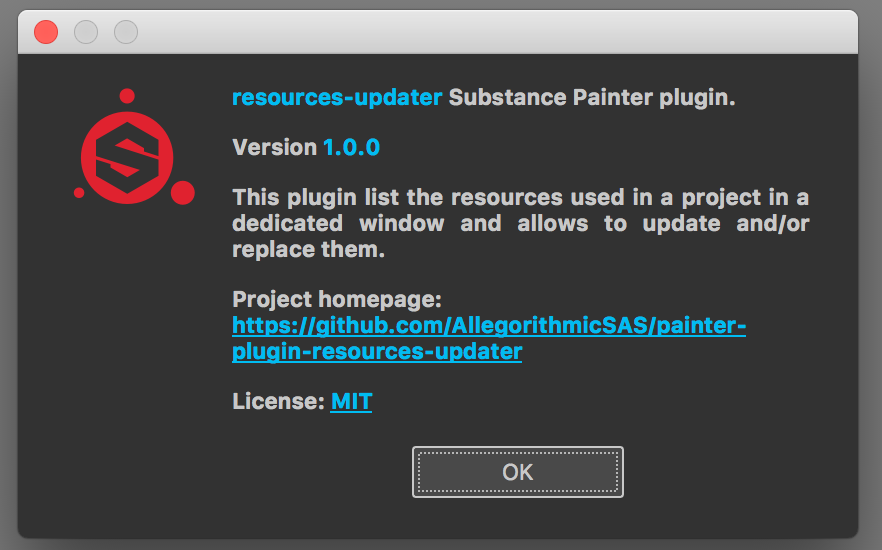
  • When you use a plugin’s “About” menu in Substance painter, the data you see there is populated from the plugin.json file of the relevant plugin. 
  • For example, the resources-updater plugin ‘about’ window looks like this: 

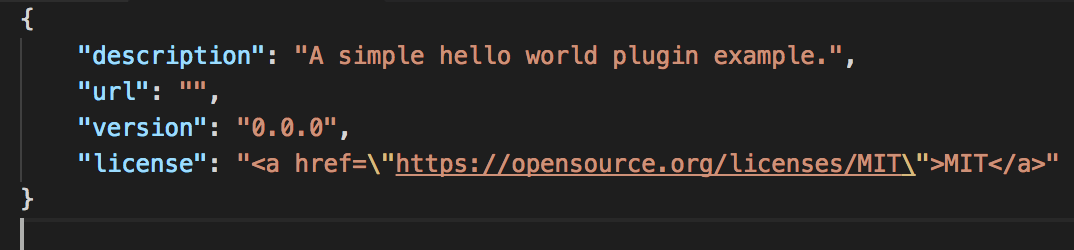
  • And looking at the plugin.json file of the resources-updater plugin, we can see how this data is defined: 


  • In this case, our JSON file is defining key : value pairs which are read by Substance Painter when it loads the plugin. 
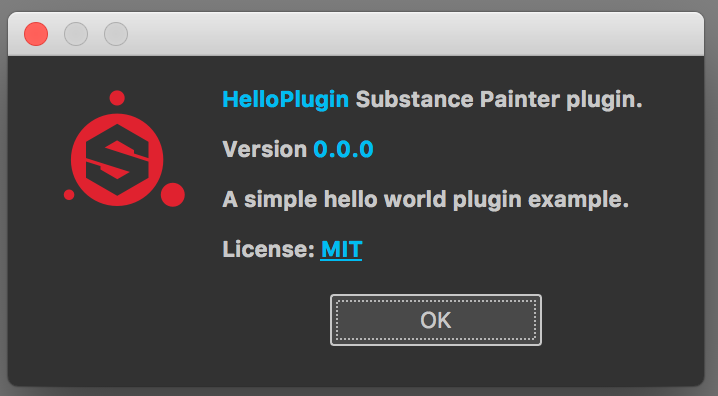
  • We can use the same structure in our HelloPlugin to have a simple about window available. 


What we get so far:

When we load the plugin...


Our very informative "about" window. 
  • Right now we can see the plugin load, but it’s not particularly useful. 
  • We also get an about window courtesy of the plugin.json file. 
  • Let’s add a window- later we can use this window to add buttons and other functionality. 

Adding a window to the plugin

  • Create a new file in our HelloPlugin directory. 
  • Name it HelloWorldWindow.qml
  • This is going to where we define our window object.
  • Inside the file, we are going to add just enough code to define an extremely simple window. 
  • A few things to note: 
    • The window class is imported using the import AlgWidgets 1.0 call. 
    • The properties are like variables on the object type.
    • Assigning a specific id to an object is useful, as it allows us to reference this object elsewhere in our plugin. 
    • Likewise, properties like the visibility can be accessed via the object id.  
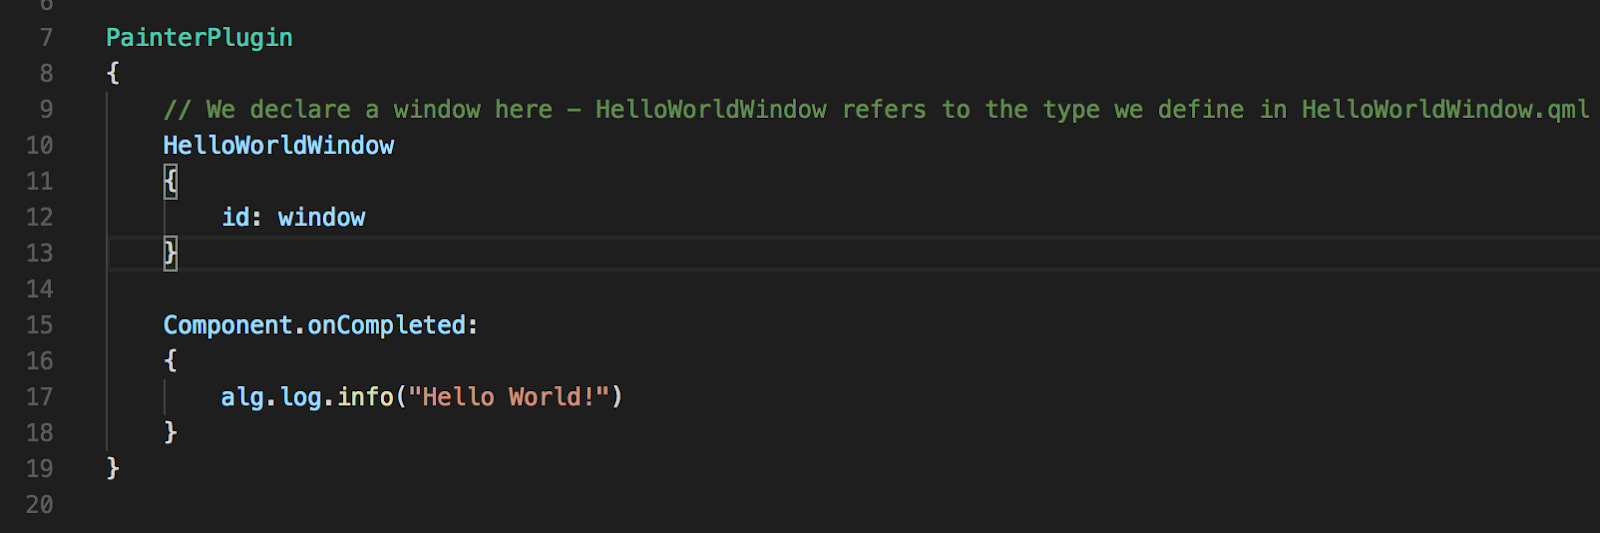
  • We now have enough code to build a simple window, but before we can see our window, we need to instantiate it in the main.qml file. 
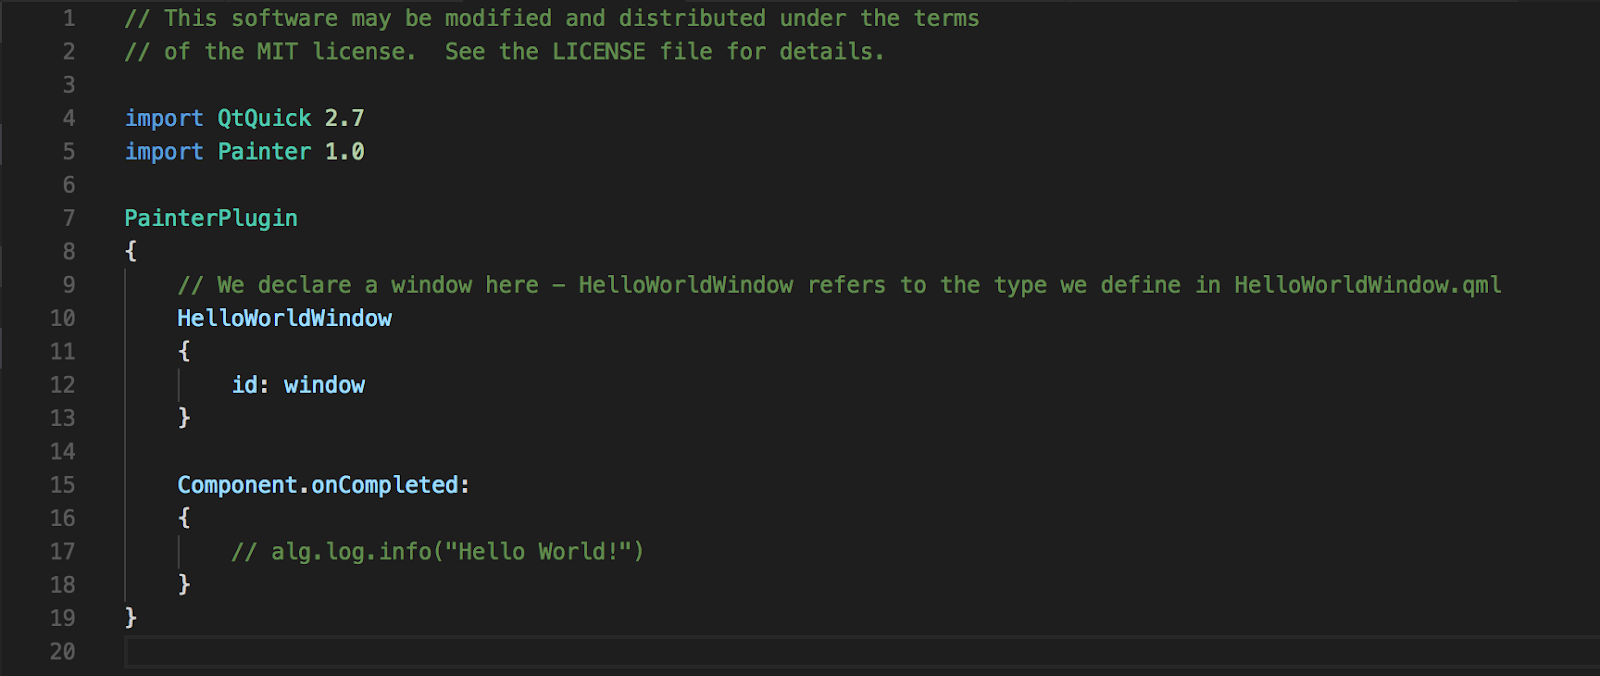
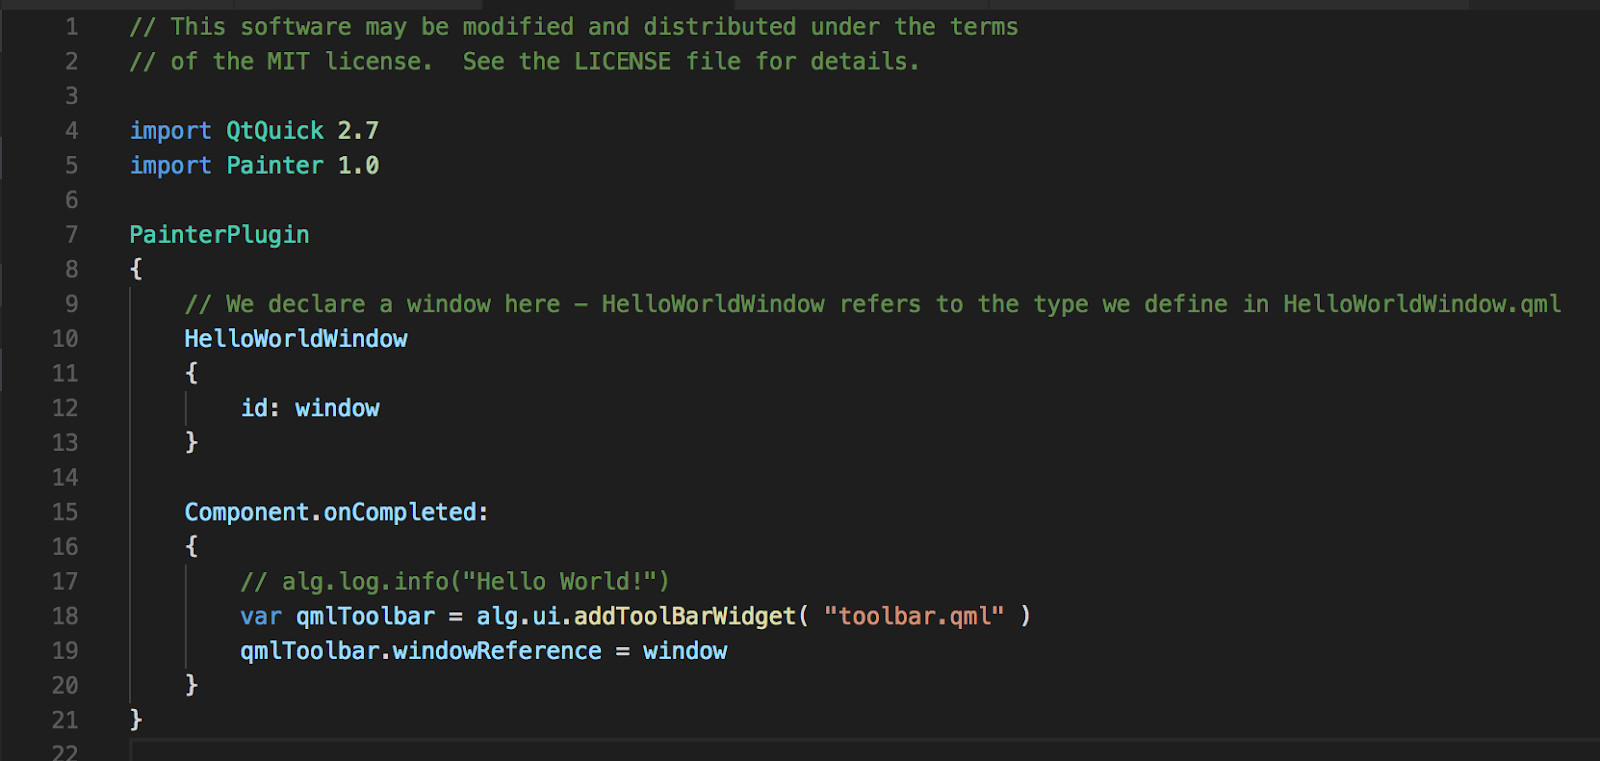
  • Open the main.qml file, and at the top, add the following code: 


  • The code above creates an instance of a HelloWorldWindow and assigns it the id “window”. 
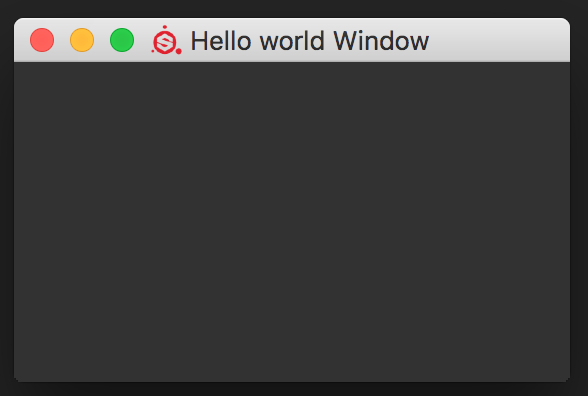
  • As the window is first instantiated when the plugin is loaded, in order to see it you will need to disable and re-enable the plugin. We will fix this later. 
Succinct. 

Creating a button:

  • Rather than logging to the console when the plugin is loaded, let’s make a button to do that. 
  • Open the “HelloWorldWindow.qml” file. 
  • We are going to add three things- 
    • A series of layout elements. 
    • A label. 
    • A button. 

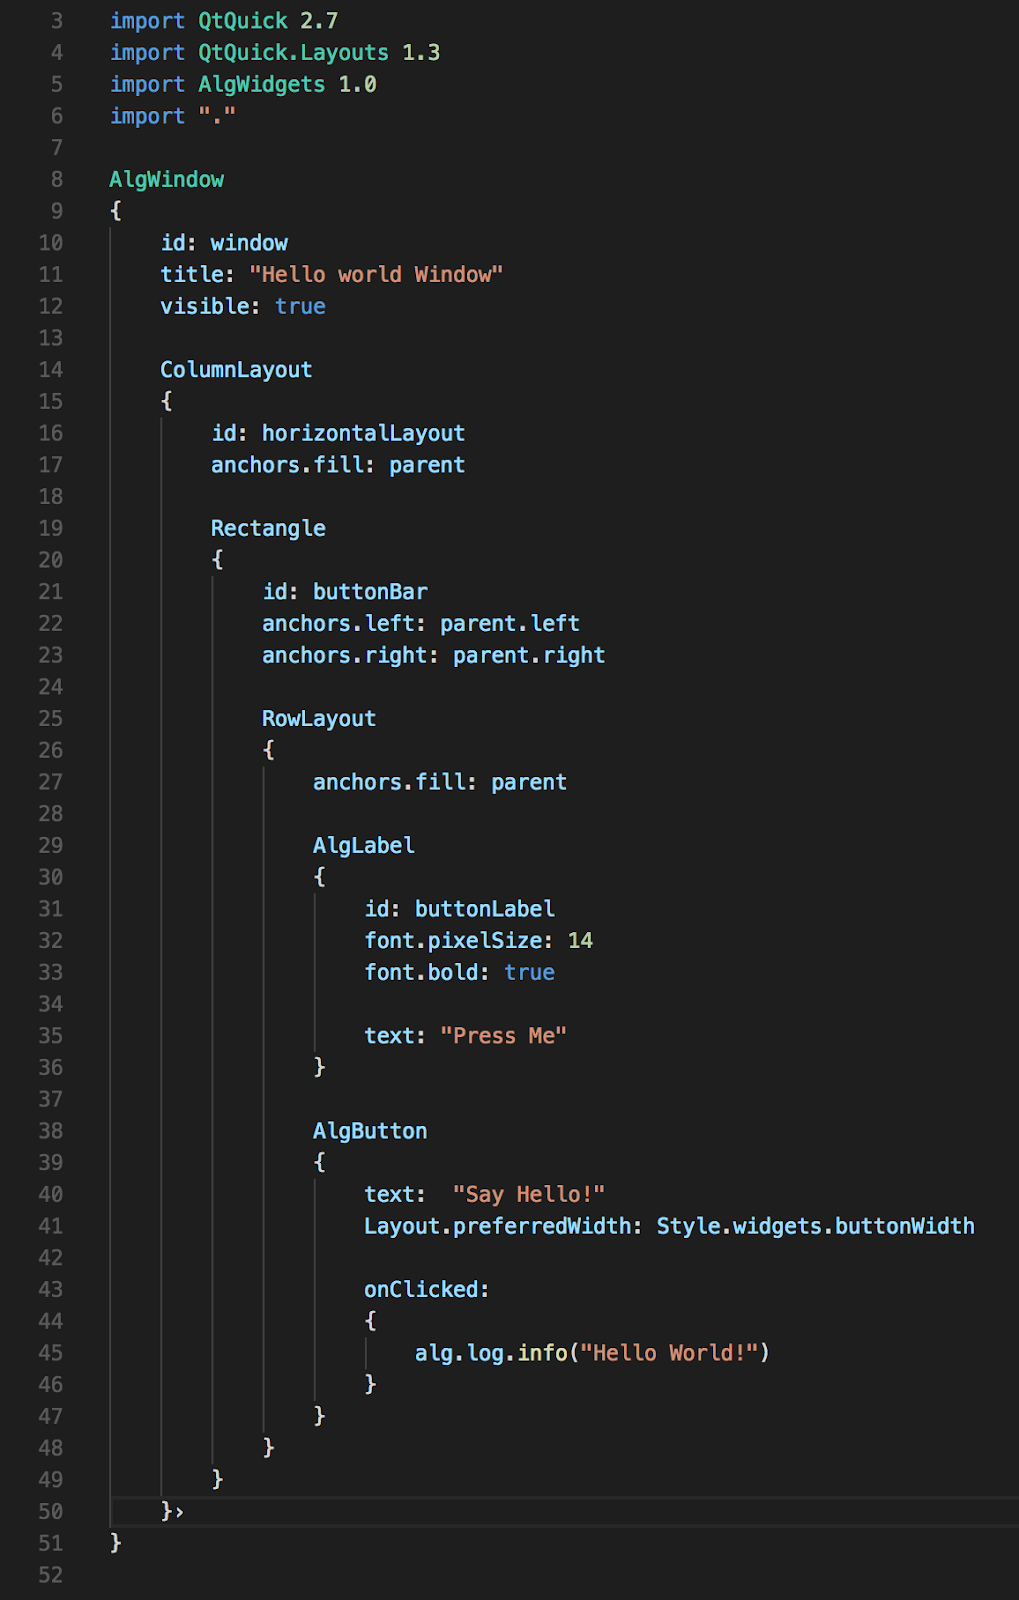
  • QML windows are created using a series of nested layout objects- for our purposes we are going to use a column, a rectangle and a row. 
  • We need to add additional import statements to access these object types- QtQuick and QtQuick.Layouts.
  • The column represents the overall layout- elements will be stacked within this shape in the order that they are added. 
  • The rectangle allows us to fill a partition of this column with a child layout. 
  • Finally the row layout allows us to add elements that will be rendered from left to right in the order in which they were added. 
  • Adding an AlgLabel and AlgButton in the row layout adds two new elements to our window. 
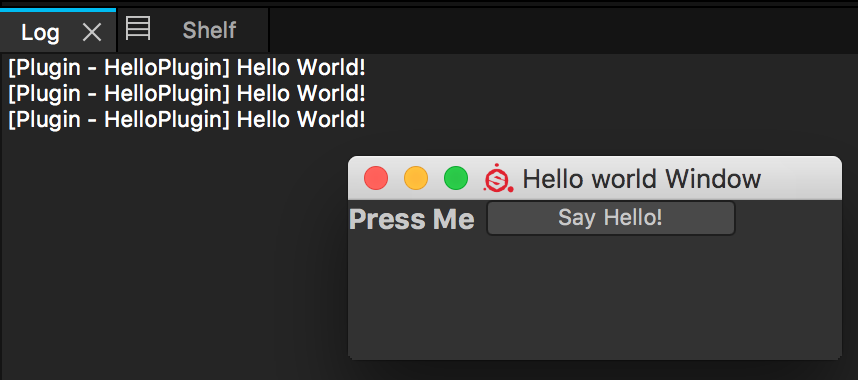
  • Finally defining the “onClicked” event for the button replaces where we were logging in main.qml on startup. 


  • I also commented out our log in the main.qml file. 

Our button is very chatty. 


Reloading your script:

  • At this point it’s good to know you can reload your script on the fly using the Plugins->HelloPlugin->Reload menu in painter. This is going to be super useful as we add more complexity. 

Adding our plugin to our toolbar:

  • Right now if you close the plugin window, it’s gone until you restart the plugin. 
  • To solve this issue, let’s add a button to the toolbar. 
  • The button in the toolbar is going to be pretty simple- all it’s going to do is toggle the visibility of our plugin window when it is pressed. 
  • First, we are going to make our HelloPluginWindow start invisible. 
  • We do this by changing the ‘visible’ property from ‘true’ to ‘false’ in the HelloPluginWindow.qml file. 
  • Now we are going to make a new file called ‘toolbar.qml’ 
  • It’s pretty simple, and similar to what we have done before- it’s just a row, with a button. 
  • Something important- the property variable “windowReference” will be filled in by our plugin when it is loaded. 
  • Because locally the windowReference starts as null, we wrap the calls to it later inside a try/catch block. 
  • This will stop terrible things from happening, like a crash, if something elsewhere in our script stops us from being able to make the window- instead of a crash we can log information to the console. 

catch(err), catch(err) not a belly scratch(err)...
  • Finally, in our “main.qml” file, we are going to add an new toolbar widget, which will instantiate our “toolbar.qml” as a button on the toolbar. 
  • We also assign our HelloWorldWindow instance to the windowReference variable in our toolbar button, using it’s id. 


  • The end result is a giant blot on the toolbar that we can click to turn our window on and off: 
Now thats UI...


Adding an icon

  • Finally, even with as good as our giant white square looks, we can add an icon.svg file to our plugin and add it to the toolbar.qml script to make it more appealing. 
  • This icon will be used in the substance toolbar to show us which button is linked to our window. 
  • Wikimedia commons has some good free svg files. For our purposes I am going to use this one
  • To add the icon to our toolbar, we need to add an Image block. 
  • This is what we are going to end up with: 

Hi! What a friendly little widget.
  • To make the icon to render correctly, we need to assign it a rectangle area, and make an image widget which is the child of that area. 
  • Using the Rectangle area gives us control over the hover state colors, and the anchors. 
  • The Rectangle is a child of the Button widget, and will inherit the button’s size information by using the “anchors.fill: parent” hint. 
  • We make sure the image also inherits these size settings by using the same hint in the child Image widget. 
  • This is the code we end up with: 


  • Beside giving us a nice little icon, there is something interesting going on where we define the color of the rectangle based off the hover state. 
This is called a ternary operator, defined by the ? symbol. 

  • In this instance the rect.hovered boolean allows us to change the assignment of a variable based on the state of a boolean. 
  • The hovered state can also let us add some other cool things, like animations, to our widgets. 

Making our icon animate:

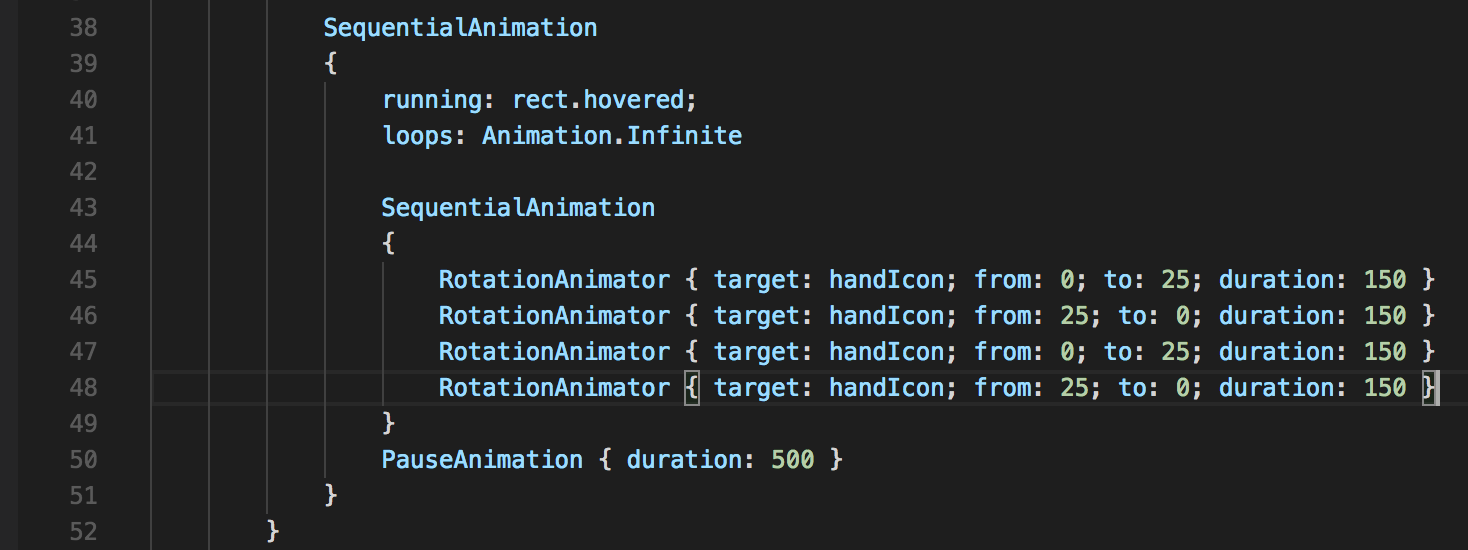
  • As a fun little exercise, we are going to animate the hand using qml animation sequences
  • Let’s make the hand wave at us. 


  • Using this code, our hand will wave at us twice each time we hover over it. 

Hellloooooo!

  • Note that the sequence is actually made out of a number of nested animations. These will run top to bottom, and in the cast of the nested sequence, each animation nested in that sequence will play before moving to the next animation in the parent sequence. 
  • Using this technique, you are able to add some complex behaviors to your widgets. 

So that's it for adding a basic plugin to Substance Painter! I'm going to follow this up with another post where we actually make it do something useful...

-Pete

Egad

One line Unreal Engine 4 (mac os) Review:
Doing Ue4 development on a Mac is not a great experience.

Update:
https://issues.unrealengine.com/issue/UE-23624 Just ran into this one... cleaning your project in XCode nukes the actual editor. Case in point.

RenderDoc

Probably familiar to any TA or Engineer who deals with their graphics pipeline, RenderDoc is a tool I have found incredibly useful for debugging graphics in Unreal.

Formerly a Crytek internal graphics debugging tool, it was released to the public in 2014. The tool is developed by Baldur Karlsson, and it boggles my mind that a tool this gosh-darn useful has been given to the public for free. Kudos to Baldur and to Crytek.

Previously I was using NVIDIA Nsight to view and debug runtime atlased textures, and it was quite slow and somewhat unintuitive to sift through the outputs to find what I was after.

RenderDoc on the other hand is not only fairly straight forward to get running, the turn around time to get meaningful output for frame-debugging is extremely rapid.

For Ue4 integration I'm using Temaran's RenderDoc Ue4 plugin, which makes frame captures in game as simple as entering a command on the command line- RenderDoc.CaptureFrame

Check it out if you need to know more about your graphics pipeline.

Substance Designer foray

I'm pretty late to the whole substance craze, having spent three years in a mobile development environment where textures larger than 512x512 caused eyebrows to raise within the engineering team.

But I kept hearing things about it being amazing, so I thought I'd give it a shot. Here is my attempt at a "hand painted" look, based off of similar processes I'd use in Photoshop.

The texture is generated using an exported sbsar material and... well, thats it. I saw a nice example online of using a switch to swap out gradient maps in a material which allowed me to create a bunch of looks in the one material.

This tool makes me happy.


A Quick Checkin- Clion, Unreal and Mac

Super quick check-in. Hello world! For the last year or so, I've been working with Echtra Inc. on a great project as a Tools Engineer/Technical Artist guy.

The project is using the Unreal Engine, which I like more and more every day. On Windows, C++ plus Visual Studio Pro and Visual Assist is a great combo, and I happily churn through my daily tasks without fighting the tools too much.

Not so on my Mac at home. Programming in Unity on a Mac is great! Mono Develop isn't amazing, but it isn't terrible. But Unreal on a Mac. I want it to be fun, I want it to be possible, but I just can't get myself to like, let alone enjoy, XCode.

On that, for anyone thinking "well, you could just use blueprints..." etc, I feel it's too much of a shackle to not be able to just dive into the guts of it. C++ or bust.

So anyway, I recently adopted PyCharm at work and really enjoyed using it for my Python tools. I noticed that JetBrains also made an IDE called CLion, and they also had recently got it running with Unreal, so I thought, what the hell, why not.

Turns out their documentation is missing a couple of important notes, that maybe they take for granted, but after a couple of forum dives I managed to actually get it compiling, and running, my little test project.

So what was missing?

Something isn't set...

Once I run through their setup scripts, these were the things I needed to double check.

  • Make sure Mono is installed and up to date, and that the mono command is available in the terminal.
  • Once you generate your CLion project via the editor (make sure to follow the instructions here) you need to update the generated configs with paths to the editor executable. 
  • eg: /Users/Shared/Epic Games/UE_4.15/Engine/Binaries/Mac/UE4Editor.app/Contents/MacOS/UE4Editor
  • Finally, now that it's pointing to the editor correctly, add an absolute path to your project's .uproject file in the project arguments. 
If everything went well, you should now be able to build and run your project from within CLion. Bye bye XCode. I'll probably post some time in the future about how I'm finding CLion. Well, it compiles, and thats a start...

GDC 2016- San Francisco Coffee places

Wait, what? 2016 already? I have not been as pro-active in this whole blogging thing as I could have been, so for now let me make it up to you all by letting you know where to find the good stuff while you are perusing the talks at GDC 2016.

Near the Moscone Center:

Special Xtra


One of my favorite places. Great coffee to get your energy back after a long talk about rigging (try the New Orleans iced coffee for a real kick). If you get there in the morning, grab one of the croissants fresh out of the oven. The staff are great, and could probably give you a bunch of pointers on good places to check out in the area.

Elite Audio and Coffee Bar


Because what goes better together than coffee and high end audio systems? Sure. Anyway, this one is very close to the Moscone, but will probably be packed full of people, so keep that in mind. Cappuccinos here are great, and once again staffed by a good crew of people. They serve Neighbor Bakehouse pastries most days, and those alone are worth checking out.

Sightglass Coffee


Great coffee, and also a good opportunity to take home a San Francisco local roast. A little bit of a walk from the Moscone, and there will probably be a line either way, but well worth the walk. Once again, Neighbor Bakehouse pastries. Eat them!


Chrome Industries


Continuing the trend of a store that sells something (in this case high end cycling gear) but also serves a decent roast, Chrome Industries is a short walk from the Moscone down 4th st. It's also near the Hotel Utah, which serves a different type of brew (worth checking out for beers!).


Not so near the Moscone Center:

Contraband Coffee bar

If you find yourself for some reason near the Polk street area, Contraband Coffee is nearby on Larkin and California. It's got good coffee and hot chocolate. The snacks are good too, but it's worth checking out Flower and Co. nearby or MyMy for a real meal. I have seen Neighbor Bakehouse pastries here too. See a trend?

The Interval


If you find yourself near Fort Mason, the interval is a good place to stop by. Good coffee, provided there aren't too many people around. The crowd can occasionally be a bit of a downer.


Four Barrel Coffee 

If you find yourself in the mission, check out the four barrel coffee place down there. I've heard mixed opinions about the Four Barrel coffee, but I'm a fan. Delicious! Being on Valencia St, its also surrounded by a bunch of excellent places to go grab lunch or dinner.

The Mill


The Mill serves four barrel coffee, as well as that whole thick toast thing. The toast is good I guess, but I really go there for the coffee- that's really good. They sell bread too which is pretty damn good bread, although carrying that around the conference floor might not work out so well.


So that's some places to get you started- have you found any that you think should be on this list? Also, hit me up you you want to meet up for coffee and talk game dev stuff. As you can tell, I like coffee.

Scratch Pad Unity Utility.

One of my friends has made his Unity Asset Store debut with "Scratch Pad"- a handy little utility that lets you bookmark scenes, animations, scripts etc.


It always kinda bugged me that you can't put files into your favorites area of the Project panel, which is something this Utility does pretty well- being able to make 'working sets' of files is pretty useful, especially when debugging all the different components that might make up a single asset in game.

Check it out here. 

Do you want to play a game?

My Chrome browser split in half last night and asked me if I wanted to play a game. Saying yes turned my browser into a pseudo python console. Apparently Google has been tracking my search history and seen that, yeah, I like Python. Ok, having the browser window suddenly split open because someone is watching your search history is vaguely creepy, but what the hey, I do like Python!

Why do they want to play a game with me? I don't know, its Google. Why did they make Google maps into Pac Man? Its Google. They do stuff like that.

The first challenge was to take an equation as a string and parse it into reverse polish notation. After thinking about it today I was able to write a passable parser that will probably make any real mathematician twitch- but it works and the code doesn't make me twitch.

The challenge was, well, challenging, but fun! It reminds me a bit of the Project Euler challenges, except this one gives you a hopping bunny when you succeed. An animated ASCII hopping bunny.

Why?

Pac Man

Hop little bunny. Hop for joy!