New Tool - ZBrush Batch Ops

This is the third from-the-ground-up iteration of a ZBrush toolkit I released early 2019, and improves on the popular base functionality of the earlier kit with new scope limiting options, dockable UI and additional functions. 

As ever, the core of the tool deals with performing batch operations on all your subtools- I get the most use out of it when I'm first importing a model OR when I'm getting ready to export it for baking. 

The renaming and color ID assignment tools have been expanded to include new functions:

  • Find and replace subtool name elements. 
  • Reset materials on subtools. 
  • Apply a random color per folder. 

 Mesh options have been expanded to include batch options for:

  • Polygroup assignment
  • Crease assignment
  • Face visibility management. 
  • Batch baking all layers. 
Finally a tool I personally find really cool, but I don't know if anyone else will find useful- "Batch It Crazy"
  • Batch ANY BUTTON that you can find the path for. 
  • ... so if the button exists on the subtools you are managing you can press CTRL and hover over the button and find it's path.
  • Enter that string when prompted...
  • And that operation will be applied to every tool in the scope. 
As a promotion of the tool use this link to get $5 off the price (and as a thank-you for reading my techie blog!)


New Tool- Blender A3D Quick Tools

This tool came out of some frustration with the Blender Hotkey layouts. Blender has amazing functionality, but my fingers aren't flexible enough to keep up with the hotkeys, and I was really missing some more context to the right click menus available. I wanted a filtered, simple toolkit that was relevant to what I needed at that moment.

The main goal was to avoid interrupting the flow of modelling so I could focus on the problem at hand rather than either look up the functionality or spend the next few seconds scanning a right click menu for that item.

I decided to take a stab at making a hotkeyed pie Menu. Where Blender suffers in the UI/UX department, it more than shines in how well it exposes it's UI functionality to Python (although selection and mesh manipulation is still a bit of a dark art compared to Maya's MEL and PyMel).

I also wanted to keep it pretty concise- the core idea behind the Pie menu was to keep it fast, and keep the cognitive load low. I think I may have ended up a little bit on the too many options side, but it's still usable without getting lost.

Here are some of the items I did a bit of extra legwork to get in:

Partial Edge Loop Selection:

What I wanted was a version of edge loop selection that would stop at UV seams or where the mesh poles. The UV seams were the biggest driver of this to make marking seams easier, but it's a handy modelling tool too.

I started with an example I looked up on Stack Exchange about how the edge loop lookup code someone had written actually works. Essentially it relies on walking around a faces edges using linked loops, but has a bunch of caveats- the code as written works as intended on a cube or something where the loop actually, you know, loops, but when applied to something with borders the results are a bit weird...

Nailed it.

The algorithm has two termination conditions- either return back to the loop we started with and break, or reach the maximum iterations allowed and break. 

To get to my intended result I added a couple of additional boundary termination clauses- 
  • if the radial loops to either side of the current loop are seams or borders, break. 
  • If one of the current loop's vertices aren't associated with exactly four faces, break.
This worked well, but to get the final result I was after, I also had to reverse my lookup direction if I hit one of the boundary clauses. This would give me partial and complete loops on either side of my connected edges.


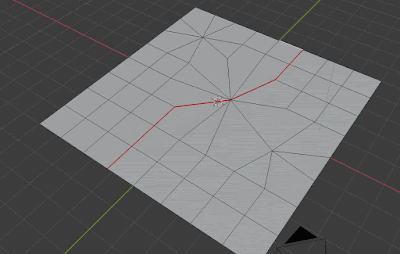
Partial edge loops are useful.


Partial edge loop selection in action.
Handy tool! If you want to see more check the tool out here.


-Pete

Blender: Calling parameters with UI Operators

A quick little tip for how to call parameters via UI operators in your scripts.

This is useful if you want to call a function that has parameters that change it's behavior- for example the bpy.ops.mesh.mark_sharp(clear=True) vs bpy.ops.mesh.mark_sharp() are the same operator with a flag that inverts the method's outcome- marking or clearing a sharp edge.

Your UI operator object wraps the python operator, including it's parameters. As long as you know what the parameters are you can call them explicitly on the UI object- either inline when it is declared, or on subsequent lines if you assign it to an object.

# ... in your Draw function...
# Default function to mark a sharp edge
pie.operator("mesh.mark_sharp", text="Mark Hard Edge", icon="BLENDER")

# We add the additional parameter here to clear the edge- this is the equivalent of calling
# bpy.ops.mesh.mark_sharp(clear=True)
pie.operator("mesh.mark_sharp", text="Clear Hard Edge", icon="BLENDER").clear = True

# If we have a custom operator with multiple parameters we can assign the operator to an object
# and call as many as required.
my_op = pie.operator("foo.bar", text="FooBar")
my_op.foo = True
my_op.bar = False
# ...etc...

Photoshop Comtypes 2020 edition

Hello! I got asked a question about smart layer manipulation and I didn't know the answer off of the top of my head, so I dug out this ye ole snippet of mine from 2012 and updated it to 2020.

Some small differences are that I had to add a couple of flags to the comtypes object creation (which may have just been a quirk of my machine, see the stackoverflow link for details) and I've added some details about manipulating smart layers at the bottom of the snippet.

Happy coding!

##############################################################################
#
# Eight years later, here is my 2020 version of how to use Comtypes to drive photoshop
#
# Here is a quick code sample showing how to manage different layers and groups  
# in a photoshop document using Python. 
#
# Pete Hanshaw, 2020
# http://peterhanshawart.blogspot.com.au/
#
##############################################################################
#
# How to make a layerSet (aka, 'group') artLayer (aka 'layer'), how to make them
# active and how to move them. 
#
# These examples use the comtypes module. Grab it here:
# http://sourceforge.net/projects/comtypes/
#
##############################################################################


#Create the application reference
import comtypes.client as ct

# https://stackoverflow.com/questions/42794530/error-pointeriunknown-when-trying-to-access-com-object-properties/42823644
psApp = ct.CreateObject('Photoshop.Application', dynamic=True)
psApp.Visible = True

#Create a new document to play with
doc = psApp.Documents.Add(256, 256, 72, 'test_bed', 2, 1, 1)

#When scripting 'groups' are called 'layerSets'. 
new_layerSet = doc.LayerSets.Add()

#Once you create a layerSet object reference, you can access it's
#'name' attribute. The same goes for other objects you can normally
#name within Photoshop.
new_layerSet.name = "I'm a layerSet"

#regular, paintable layers are called 'ArtLayers'
new_art_layer = doc.ArtLayers.Add()
new_art_layer.name = "I'm an ArtLayer"

#To add a nested art layer into a LayerSet, use our layerSet object as a reference
nested_art_layer = new_layerSet.ArtLayers.Add()
nested_art_layer.name = "I'm a nested ArtLayer"

#The same goes for adding a nested LayerSet!
nested_layerSet = new_layerSet.LayerSets.Add()
nested_layerSet.name = "I'm a nested LayerSet"

#and so on!
deep_art = nested_layerSet.ArtLayers.Add()
deep_art.name = "Deep man, deep."

#Every time a new object is made, it will become the active layer. 
#To make other layers active, you can refer to them either by their name, or 
#their index location. 

#For example:

#Making an art layer active using the layer's name:
doc.activeLayer = (doc.artLayers["I'm an ArtLayer"])

#Making an art layer active using the layer's index location:
doc.activeLayer = (doc.artLayers[-1]) #This will select the background!

#Selecting a nested art layer is a little more difficult, as you have to
#'drill down' through the hierachy in order to select it. 
doc.activeLayer = (doc.layerSets["I'm a layerSet"].
    layerSets["I'm a nested LayerSet"].
    artLayers["Deep man, deep."])

#Moving a layer in the hierachy is done using the move command.
#The arguments specify which hierachy to move in, and where to put it. 

#For example, this will move the first layerSet we made just above the background
#layer.

#Make a new layer set
mobile_layerSet = doc.LayerSets.Add()
mobile_layerSet.name = "move me"

#Move the 'mobile' layerSet to just after the 'background' layer
mobile_layerSet.Move(doc, 2)

# Smart Layer Manipulation Examples adapted from:
# https://www.photopea.com/tuts/edit-smart-objects-with-a-script/
# Create a smart object layer.

# CREATING A SMART LAYER
# select a layer that you want to work with
smart_layer = doc.ArtLayers.Add()
smart_layer.name = "Smarty pants Layer."

doc.activeLayer = smart_layer

# Convert the active layer into a smart object
psApp.executeAction(psApp.stringIDToTypeID("newPlacedLayer"));

# EDITING A SMART LAYER
# Now we can edit the smart object
psApp.executeAction(psApp.stringIDToTypeID("placedLayerEditContents"))

# now, the Smart Object is an active document, we can work with it. Rename the layer...
smartDoc = psApp.activeDocument
super_smart_layer = smartDoc.ArtLayers[0]
super_smart_layer.name = "Amazingly smart layer."

# save the smart object and close it
psApp.activeDocument.save()
psApp.activeDocument.close()

# We are now back in the root object

# QUERYING A SMART LAYER
# If we want to check if a layer is smart, we can query it...
doc = psApp.activeDocument

for layer in doc.ArtLayers:
    # 17 is a psSmartObjectLayer - see the Adobe Scripting API 'PsLayerKind' to see what each value means.
    if layer.Kind == 17:
        print "We found a smart layer named {}".format(layer.name)

New Tool- Substance Painter File Manager


I've added a new tool to my Gumroad store- a Substance Painter file manager to help browse larger projects.


Writing the tool was interesting- it took a while to find my way around some of the more advanced ideas in QML but I was pretty happy with how well it ties into the default Substance Painter GUI, as well as the examples contained in the default Painter installation directory.

If you want to see some examples of Substance's use of QML take a browse through your C:/Program Files/Allegorithmic/Substance Painter/qml/ directory. These are a fantastic resource, and it's great to see them included and accessible.

The Painter Javascript API is still very limited. A friend suggested I write the tool in the new Python API but I just missed the boat on that, with the majority of work already done prior to the release (I only have so much midnight oil to burn). To access the operating system and file information, I wrote a simple file browser utility in C++ and used the JS API to bridge it with the QML user facing GUI.

The cool thing about this approach (as heavy handed as it is) is that it massively opens up the options available to you in terms of OS operations, while at the same time keeping the compiled program really tiny (53kb) and removing worries about correct Python configurations.

That being said, I totally want to see what's available in the new Python API to see what kind of time saving tools I can provide to the content creators.


Maya- find node names that are not unique

Sometimes you can end up in situations where Maya Nodes don't have unique names. Usually this won't cause issues until you are doing global changes (like the hack amazing workaround where you remove namespaces on export)

Shawn Miller put me onto this handy little snippet to identify nodes that don't have Unique names:

string $allDagNodes[] = `ls -sn -dag`;
for ($node in $allDagNodes)
if (`gmatch $node "*|*"`)
print ($node+" is not uniquely named");

Thanks Shawn!

Maya Name Helpers

Hey, who likes well organized files? This guy. Who like manually renaming hundreds of objects? Nobody I've met.

I've found one of the best ways to help my art teams keep their content organized it to make it easier for them to manage their object names. I've wrapped up some of the most useful little scripts into this handy tool on Gumroad.

- Written for Maya 2019
- Batch rename multiple assets at once.
- Easily add, remove or replace elements in names.
- Quickly add or remove prefixes and suffixes.
- Easily convert between camelCase and underscore_naming
- Docks with the Maya GUI.
- Works on nodes, materials, objects. Pretty much anything you can select via the GUI.